DIY Lightning Rod Installation in Sunrise Florida
Living in Sunrise means enjoying sunny skies most days—until dark clouds roll in without warning. I’ll never forget watching a neighbor’s oak tree split by a strike last summer, its smoldering trunk a stark reminder of nature’s raw power. That moment made me realize: our homes aren’t just shelters—they’re vulnerable to forces we can’t control.
Florida’s storm season turns rooftops into targets. A single bolt can surge through wiring, fry electronics, or worse—ignite fires that threaten everything you’ve built. But here’s the good news: you don’t need to leave safety to chance. With careful preparation and the right approach, homeowners can create a shield against these unpredictable threats.
This guide isn’t about fear. It’s about empowerment. You’ll learn how to channel destructive energy safely into the ground using methods trusted by professionals. From mapping your roof’s weak points to selecting copper components that last for decades, every step matters. And if questions arise? Expert guidance is just a call away at (954) 742-4164.
Key Takeaways
- Residential lightning strikes cause fires, appliance damage, and safety risks
- Whole-house systems redirect electrical surges safely to the ground
- Proper planning and code compliance ensure long-term reliability
- Material quality directly impacts protection effectiveness
- Professional support enhances DIY project success
Introduction: Protecting Your Home from Lightning Strikes

Florida’s weather shifts faster than most realize. One minute you’re basking in sunshine—the next, thunder rattles windows. Roofs become bullseyes during storms, but smart preparation changes the game.
How Modern Defense Systems Work
These networks act like traffic controllers for electrical surges. They create invisible shields using three key elements:
| Feature | Professional Installation | Basic Setup |
|---|---|---|
| Surge Pathways | Precision-mapped routes | Generic placement |
| Ground Connections | Multiple low-resistance rods | Single entry point |
| Safety Certification | UL/NFPA 780 compliant | No third-party testing |
Proper systems don’t attract strikes—they outsmart them. Copper conductors intercept random bolts, steering energy away from wiring and gas lines. This reduces fire risks by 85% compared to unprotected homes.
Tailored Solutions Beat Guesswork
Every roof slope and chimney changes how energy flows. Experts analyze your property’s weak spots using local strike data and structural blueprints. One miscalculation could leave appliances vulnerable to power surges.
Our team at (954) 742-4164 helps homeowners:
- Identify high-risk zones
- Choose corrosion-resistant materials
- Verify grounding effectiveness
Protection isn’t just about rods and cables. It’s about creating a seamless energy diversion plan that works when skies turn violent. That peace of mind lasts long after storm clouds pass.
DIY lightning rod installation: Key Considerations

Storm season demands more than boarded windows. Your first line of defense starts with certified components and strategic planning. Cutting corners here risks your entire investment.
Why Certification Matters
UL and NFPA 780 codes aren’t suggestions—they’re battle-tested rules for survival. These standards dictate everything from metal thickness to ground rod depth. Ignore them, and your setup becomes decorative.
| Feature | UL-Certified Components | Non-Certified Parts |
|---|---|---|
| Material Quality | Solid copper/aluminum alloys | Mixed metals prone to corrosion |
| Conductivity Rating | 200+ kA capacity | Unverified load handling |
| Compliance Check | Third-party tested | Self-certified claims |
Toolkit Essentials
Professional-grade materials make or break your project. Use these non-negotiables:
- 12-gauge copper conductors (UL-listed)
- Aluminum alloy air terminals
- NFPA-approved grounding clamps
Expert tip: Mixing metals causes galvanic corrosion. Stick to one material type for all components. Our team at (954) 742-4164 helps source compliant parts that withstand Florida’s salty air.
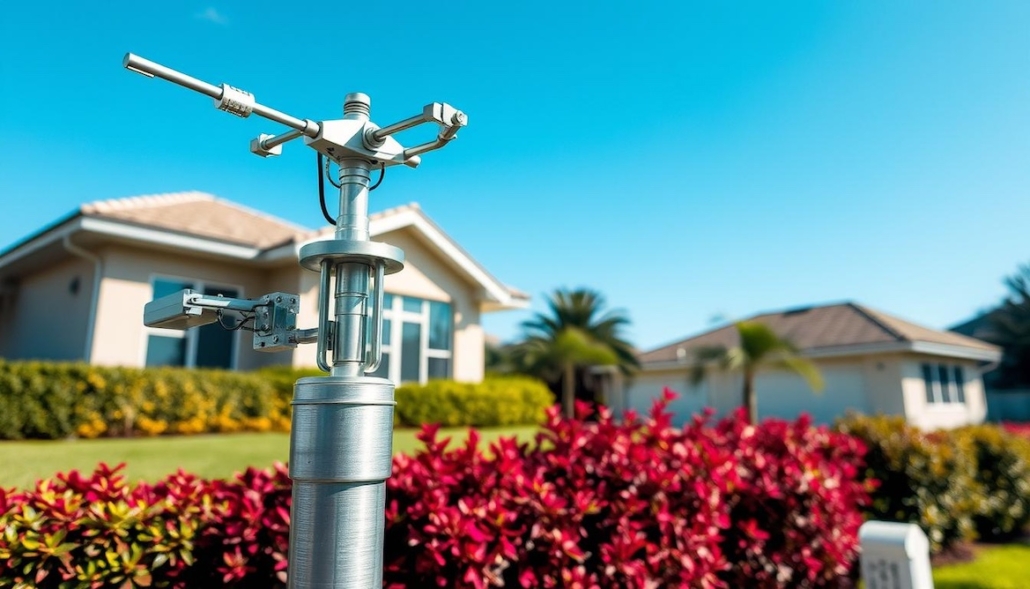
Components of a Lightning Protection System
A robust defense against electrical storms relies on precision-engineered components working in unison. Each part plays a critical role in diverting destructive energy away from your home’s structure and sensitive electronics.
Strike Interceptors and Energy Pathways
Air terminals form the first line of defense. These solid copper or aluminum rods perch on roof peaks, engineered with tapered tips that optimize strike capture. Standard 24-inch models protect larger areas, while 12-inch versions blend discreetly with architectural features.
Heavy-duty conductors form the system’s circulatory network. These thick cables channel captured energy downward using materials rated for 200,000+ amp surges. Proper routing avoids gas lines and flammable materials.
Surge Management and Secure Connections
Ground rods complete the safety chain. Ten-foot copper-clad steel stakes buried below frost lines ensure reliable energy dissipation. Multiple rods spaced 10 feet apart create low-resistance paths to earth.
| Component | Key Feature | Purpose |
|---|---|---|
| Surge Protectors | Voltage clamping | Shield appliances |
| Terminal Fittings | Weatherproof seals | Maintain conductivity |
| Ground Rods | Deep soil penetration | Energy dispersion |
Specialized fittings prevent corrosion at connection points. Aluminum alloy brackets withstand Florida’s humidity without degrading. For component compatibility checks or material specifications, call (954) 742-4164 for personalized guidance.
Designing Your Installation Blueprint
Creating an effective defense against electrical storms starts with strategic planning. Every building’s layout demands customized solutions—what works for a flat-roofed ranch won’t protect a multi-gabled colonial. Precision matters when safeguarding your property’s most vulnerable areas.
Mapping Out Highest Points and Critical Areas
Begin by identifying your roof’s natural strike zones. Ridge peaks, chimneys, and dormer windows act as nature’s preferred pathways during storms. Professional assessments use infrared mapping to detect subtle elevation changes invisible to the naked eye.
Consider these factors during your survey:
- Historical weather patterns in your ZIP code
- Proximity to tall trees or metal structures
- Existing electrical and gas line locations
Planning Air Terminal Placement and Connections
Air terminals function best when spaced 20-25 feet apart along roof ridges. For complex layouts with multiple peaks, follow the 50-foot maximum spacing rule between primary interceptors. This ensures overlapping coverage zones that leave no gaps.
| Roof Type | Terminal Spacing | Special Considerations |
|---|---|---|
| Gable | 22 feet | Align with ridge vents |
| Hip | 18 feet | Corner reinforcement needed |
| Flat | 25 feet | Perimeter focus |
Grounding routes require equal attention. Conductors should follow straight paths from terminals to rods, avoiding sharp bends that impede energy flow. Call (954) 742-4164 for blueprint reviews that account for local soil conductivity and architectural nuances.
Step-by-Step Installation Process
Weatherproofing your home against electrical storms demands precision and methodical execution. Proper component placement and routing techniques determine whether your system functions as intended or becomes decorative hardware.
Mounting Interceptors and Anchoring Components
Begin by securing non-conductive brackets to structural supports using fasteners rated for your roofing material. UL-certified air terminals require vertical alignment within 2 degrees of plumb—use a laser level for accuracy. Pro tip: Reinforce brackets near roof edges with stainless steel lag bolts for hurricane resistance.
“Mechanical stability trumps speed during this phase. Each bracket must withstand 150 mph winds without compromising seal integrity.”
Routing Pathways and Ensuring Continuity
Heavy-gauge cables demand strategic placement. Attic routing protects conductors from UV damage and accidental cuts during gutter cleaning. Compare common approaches:
| Routing Method | Advantages | Considerations |
|---|---|---|
| Exterior Surface | Faster installation | Requires UV-resistant sheathing |
| Attic Space | Enhanced protection | Needs fire-rated penetration seals |
Create redundant paths using radial patterns around chimneys and vents. Through-roof assemblies maintain weather seals while preserving conductivity—apply silicone caulk before tightening compression fittings.
Grounding clamps require annual inspections in coastal areas. For real-time guidance on connection techniques or material compatibility checks, call (954) 742-4164 during critical phases.
Grounding Techniques and Electrical Safety
The final defense against nature’s fury lies beneath your feet. Proper energy dissipation requires precision engineering where copper meets earth. Without reliable connections to the soil, even the best rooftop components become ineffective.
Proper Ground Rod Installation and Resistance Requirements
Copper-clad steel stakes form the backbone of effective systems. These rods must penetrate at least ten feet into undisturbed soil—below frost lines and seasonal dry zones. Two rods spaced 20 feet apart create redundancy, while specialized drivers ensure straight vertical placement.
Resistance testing separates functional setups from decorative ones. Ten ohms or less proves your system can handle massive energy surges. Sandy soils often require deeper placements or soil enhancement compounds to achieve this benchmark.
Using Clamps, Straps, and Waterproof Seals
Corrosion-resistant hardware maintains conductivity through Florida’s humid summers. Bronze clamps create permanent bonds between cables and rods, while UV-stable straps secure above-ground connections. Silicone-based sealants prevent moisture intrusion at critical junctions.
| Component | Purpose | Lifespan |
|---|---|---|
| Exothermic welds | Fuse conductors | 50+ years |
| Compression fittings | Weatherproof joints | 25 years |
| Inspection ports | Monitor conditions | Lifetime |
Annual inspections catch early signs of wear. Our team at (954) 742-4164 uses micro-ohm meters to verify connection integrity—because visible corrosion often appears long after performance degrades.
Inspection, Maintenance, and Compliance
Your home’s defense against storms needs regular check-ups like your health. Over time, weather exposure and natural wear can compromise even robust safety systems. Proactive care ensures continuous operation when threats emerge.
Essential Upkeep Practices
Schedule seasonal inspections after extreme weather events. Look for greenish discoloration on metal parts—a telltale sign of corrosion. Tighten any loose connectors using insulated tools to maintain proper conductivity.
Test ground resistance annually with a multimeter. Readings below ten ohms indicate optimal energy dissipation. Coastal properties may require more frequent checks due to salt air accelerating wear.
Meeting Safety Standards
NFPA 780 certification isn’t just paperwork—it’s proof your setup meets rigorous performance benchmarks. Professionals verify conductor spacing, material thickness, and grounding depth during compliance audits.
Critical components degrade faster than homeowners realize:
- Bronze clamps lose 30% conductivity after 5 years
- UV exposure weakens cable sheathing
- Soil shifts alter ground rod effectiveness
For certified inspections and maintenance plans tailored to Florida’s harsh conditions, call (954) 742-4164. Our team provides documentation that satisfies insurance requirements while keeping your protection system battle-ready.